Affiliate Disclosure: This article contains affiliate links. If you purchase through these links, we may earn a commission at no extra cost to you. This helps support our site and allows us to continue creating in-depth gear reviews. Our recommendations are based on independent testing and research.
Trail cameras are a hunter's eyes in the woods when you can't be there. A properly set up trail camera network can reveal deer patterns, identify shooter bucks, pinpoint travel corridors, and dramatically increase your chances of filling a tag. But placement makes all the difference—here's how to set up trail cameras like a pro.
Choosing the Right Trail Camera
Before we discuss placement, let's make sure you have the right tool for the job. Trail cameras fall into three categories:
- Standard SD Card Cameras ($50-150): Store photos on a memory card that you physically retrieve. Most affordable, but require visiting the camera location to check photos—which means more human scent in the area.
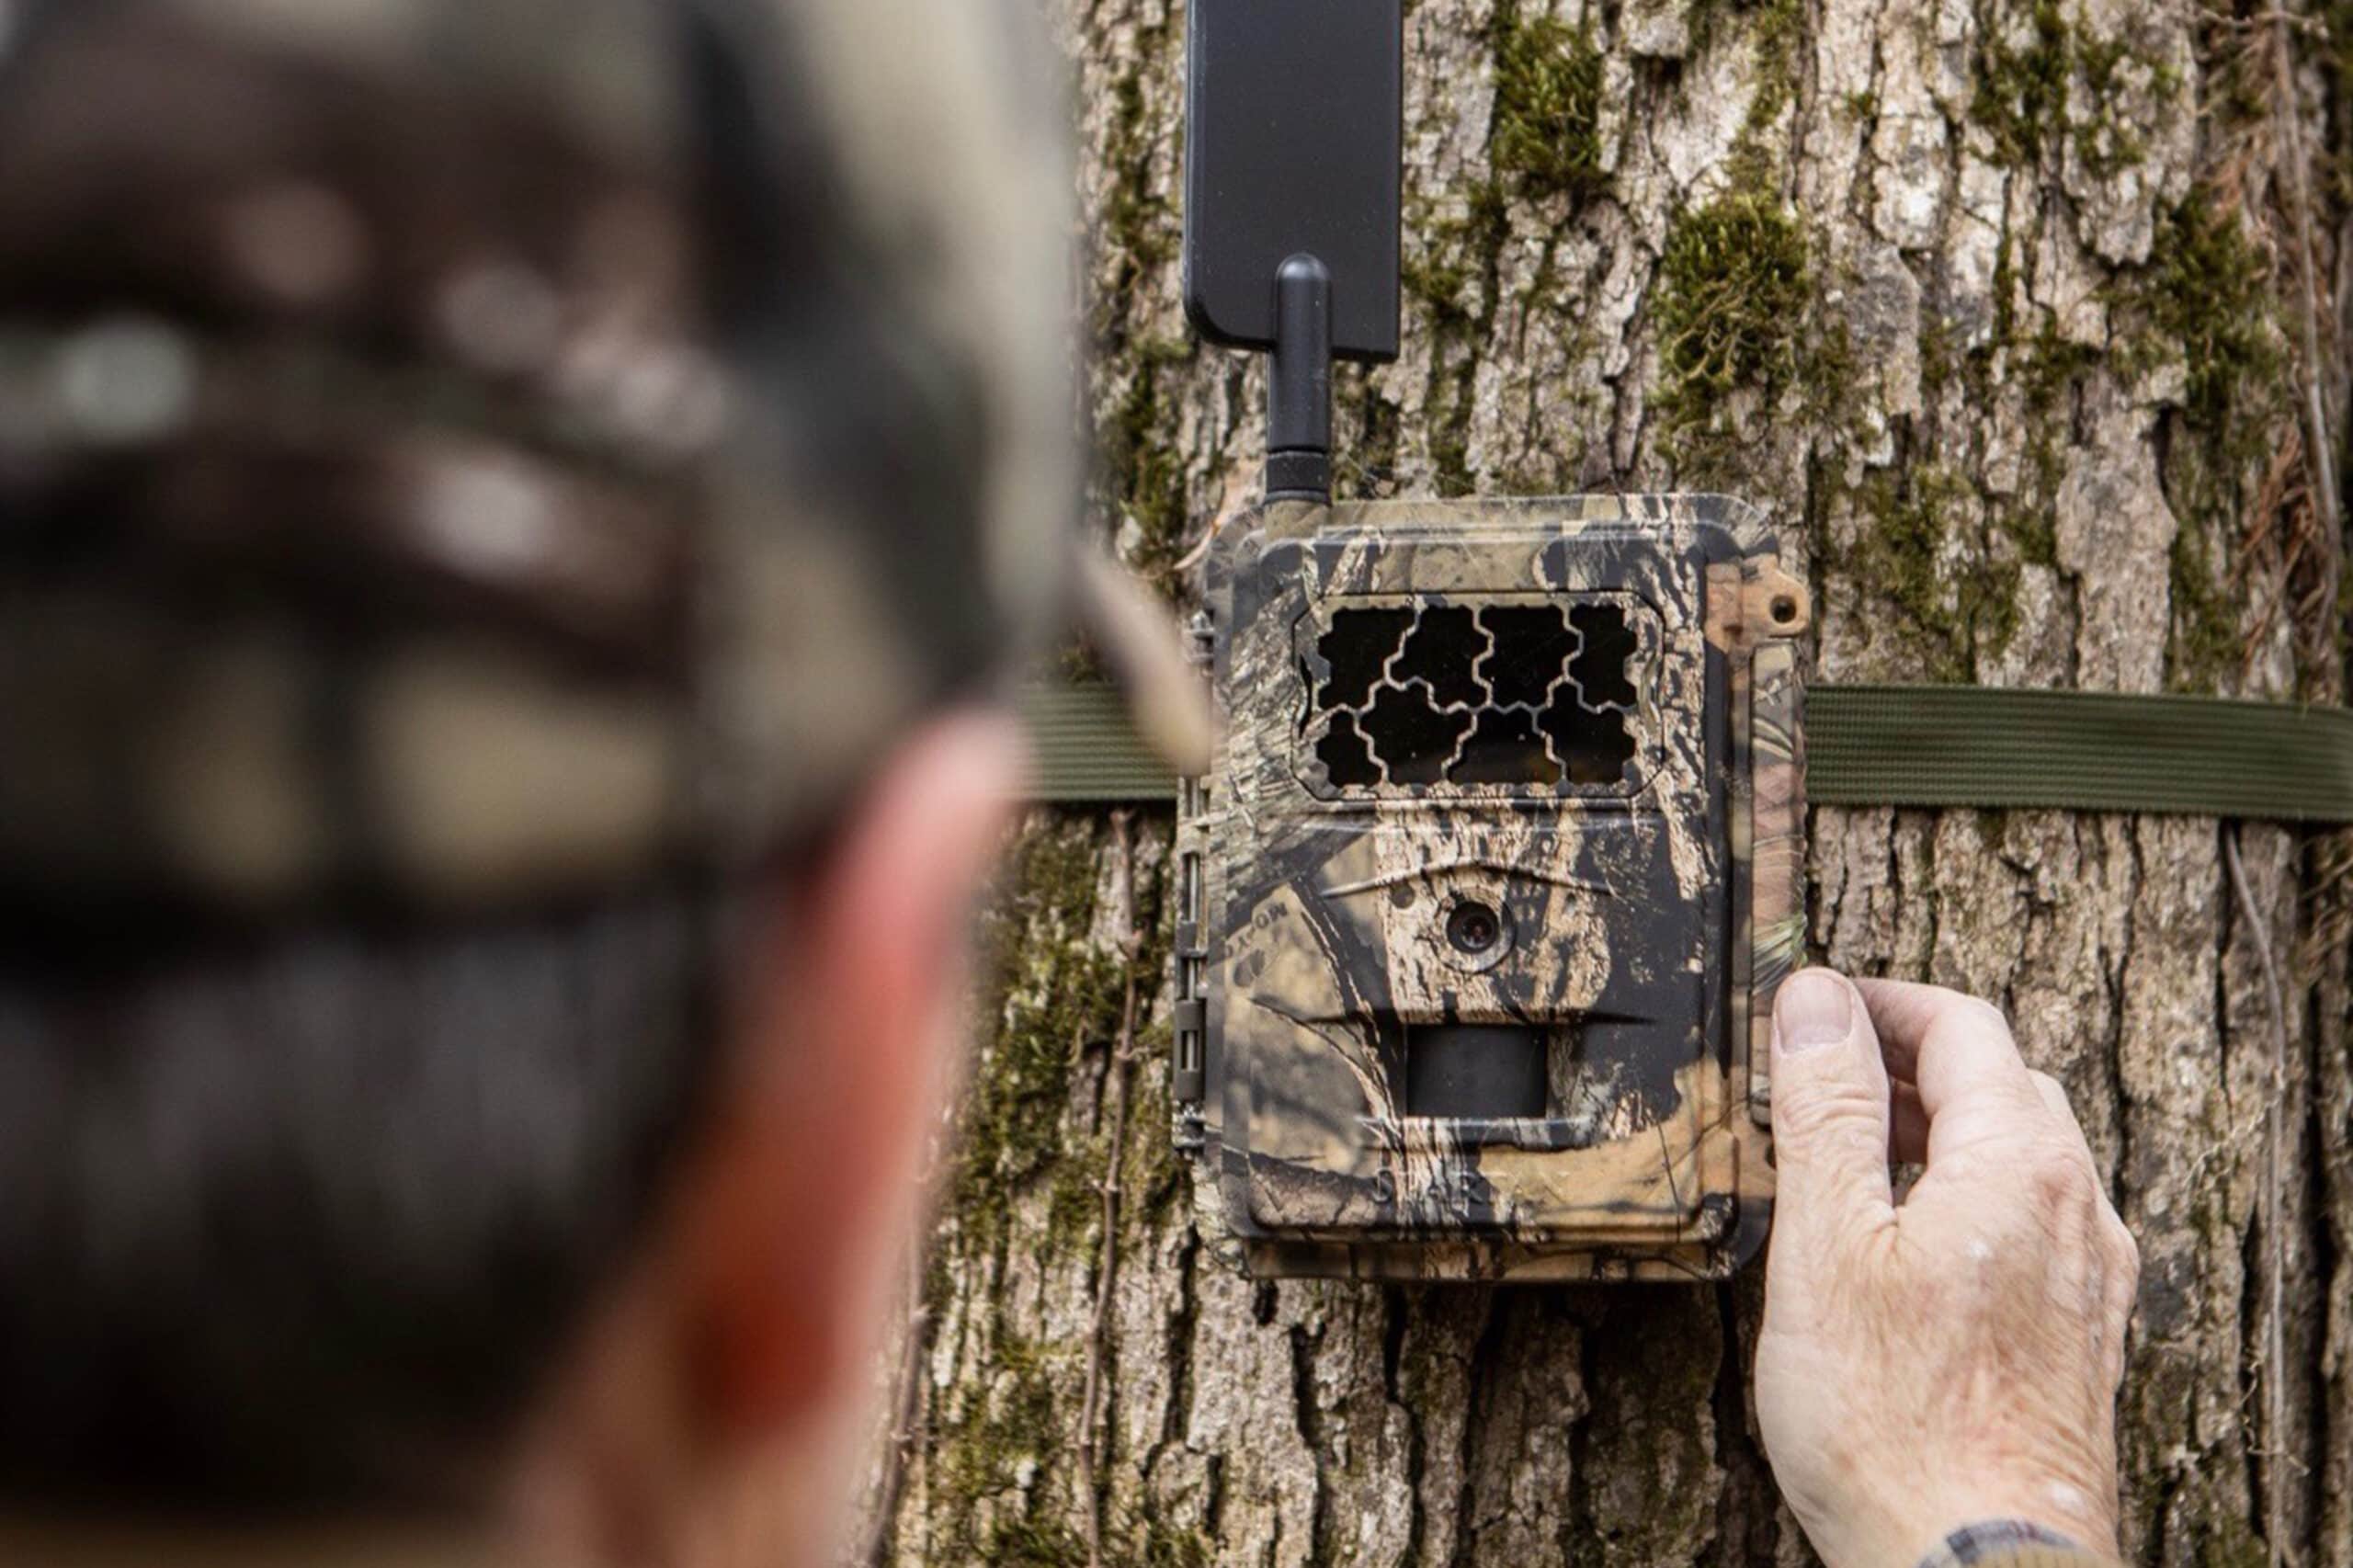
- Cellular Cameras ($100-300 + monthly plan): Send photos to your phone via cellular networks. More expensive but eliminate the need to check cameras in person. This is a huge advantage for reducing human pressure on your hunting areas.
- Wi-Fi Cameras ($80-200): Connect to your phone when you're within range (typically 50-100 feet). A compromise between standard and cellular—you still need to visit, but you can download photos from a distance.
Our Camera Recommendations
- Best Cellular: Tactacam Reveal X 2.0 – Best image quality, reliable sends
- Best Budget: Stealth Cam Fusion X – Affordable cellular option
- Best Standard: Moultrie Mobile Edge 2 – Excellent detection and image quality
Essential Trail Camera Settings
Photo vs. Video Mode
For scouting purposes, we recommend photo mode with a 3-photo burst. This captures the animal entering the frame, in the frame, and leaving—giving you direction of travel information. Video mode is tempting but drains batteries much faster and fills memory cards quickly.
🎯Want our complete How-To Guides checklist? Download it free — field-tested and printable.
Download Free ChecklistDetection Delay
Set your detection delay based on location:
- Food plots/feeders: 30-60 second delay (animals linger, so you don't need rapid fire)
- Trails/corridors: 5-10 second delay (animals move through quickly)
- Scrapes/rubs: 15-30 second delay (moderate activity level)
Time-Lapse Mode
An underutilized feature, time-lapse mode takes a photo at set intervals regardless of motion detection. Set a time-lapse photo every 5 minutes during daylight hours over a food plot or field edge to capture deer that might pass outside your camera's detection zone.
Strategic Camera Placement: The 5 Best Locations
Location 1: Trail Intersections
Where two or more deer trails converge is gold for trail cameras. These intersections see traffic from multiple directions, giving you the highest volume of deer photos. Mount your camera at the intersection itself, angled slightly to cover as much of the crossing as possible.
Setup tip: Mount the camera 3 feet off the ground on a sturdy tree, angled slightly downward. Aim the camera north or south to avoid the sun triggering false captures at dawn and dusk.
Location 2: Food Sources
Whether it's an oak flat dropping acorns, a food plot, or an agricultural field edge, food sources are magnets for deer activity. Position cameras 10-15 yards from the food source, aimed across the entry point rather than directly at the food.
Location 3: Water Sources
During hot early-season conditions, water sources can be more productive than food sources. Creeks, ponds, and isolated water holes in dry areas concentrate deer movement. Position cameras within 5-10 feet of the water's edge, aimed along the bank to capture approaching deer.
Location 4: Scrapes and Rubs
During the pre-rut and rut, scrapes and rub lines are deer highways. Position cameras 8-10 feet from active scrapes, aimed to capture the full scrape area. For rub lines, position cameras along the line of rubs to capture bucks traveling between them.
Location 5: Funnels and Pinch Points
Terrain features that concentrate deer movement—saddles, creek crossings, fence gaps, narrow strips of timber between fields—are reliable camera locations year-round. These locations produce consistent results because deer are forced through a confined area.
Mounting and Positioning
Height and Angle
- Standard height: 3 feet off the ground (waist height when standing). This captures the body and head of deer walking past.
- Security height: 7-8 feet, angled sharply downward. Prevents theft but changes the photo perspective. Use security boxes at this height.
- Angle: Tilt the camera 5-10 degrees downward from horizontal for best coverage.
Direction
This is where most hunters get it wrong. Never aim your camera east or west. The rising and setting sun will trigger thousands of false captures and wash out your images. Always aim cameras north or south when possible.
Detection Zone
Clear brush, grass, and low-hanging branches in front of your camera's detection zone. Moving vegetation triggers false photos, drains batteries, and fills memory cards. Clear a lane 10-15 feet wide and 20-30 feet deep in front of the camera.
Reducing Human Scent at Camera Sites
Every time you visit a trail camera, you're depositing human scent that can alter deer behavior. Minimize your impact with these practices:
- Wear rubber boots: Rubber doesn't hold scent like leather or fabric. Knee-high rubber boots are standard for camera checks.
- Check cameras midday: Deer are least active between 11am and 2pm. This gives your scent time to dissipate before evening movement begins.
- Use existing paths: Walk along creek beds, ATV trails, or field edges rather than cutting through bedding areas.
- Limit visits: If using SD card cameras, check no more than once every 2-3 weeks. Better yet, invest in cellular cameras and eliminate visits entirely.
- Wear gloves: Latex or rubber gloves prevent depositing scent on the camera and surrounding trees.
Battery and Memory Card Tips
- Use lithium batteries: Lithium batteries last 2-3x longer than alkaline, especially in cold weather. They're more expensive upfront but save money and hassle over a season.
- Carry spares: Always bring a fresh set of batteries and a formatted memory card when checking cameras.
- Use quality SD cards: Stick with name-brand cards (SanDisk, Samsung) rated Class 10 or higher. Cheap cards cause write errors and lost photos.
- Format cards in-camera: Always format memory cards in the trail camera, not on your computer. This ensures proper file structure for your specific camera model.
Reading Trail Camera Data
Photos are only valuable if you analyze them properly. Here's what to look for:
- Time stamps: Build a pattern of when specific deer visit. Note consistent times to plan your hunt timing.
- Direction of travel: Multiple photos in a burst reveal which direction deer are heading. This tells you where to position your stand relative to the camera.
- Moon phase correlation: Track whether deer movement changes with moon phases on your specific property.
- Weather correlation: Note which weather conditions produce the most movement. Cold fronts, barometric pressure drops, and first frosts often trigger increased activity.
Final Thoughts
Trail cameras have revolutionized deer hunting by removing the guesswork from stand placement and hunt timing. Invest in quality cameras, place them strategically, minimize your human footprint at camera sites, and—most importantly—actually study the data they produce. A trail camera that sends thousands of photos you never analyze is just an expensive tree ornament.
Advanced Trail Camera Tactics
Mock Scrape Camera Sets
One of the most productive trail camera setups is over a mock scrape — an artificial scrape you create to attract bucks. Make a mock scrape beneath an overhanging licking branch (a branch 4-5 feet off the ground) by clearing leaf litter in a 3-foot circle and exposing bare dirt. Apply commercial scrape starter or fresh dirt from another active scrape area.
Mount your camera 10-15 feet from the scrape, 3-4 feet high, aimed slightly downward. Mock scrapes near travel corridors attract nearly every buck in the area during pre-rut and rut periods. The licking branch is the key — bucks visit the branch more frequently and predictably than they visit the ground scrape.
Multi-Camera Mapping
Using three or more cameras in a grid pattern across your property creates a map of deer movement. When the same buck appears on multiple cameras, you can plot his travel route and identify the specific corridors he uses. This data reveals not just where deer go, but when and in what sequence — critical intelligence for stand placement.
Space cameras 200-400 yards apart along suspected travel routes. Run them simultaneously for 2-4 weeks. The resulting data shows buck movement direction, timing, and frequency with a level of detail that no amount of boots-on-ground scouting can match.
Time-Lapse Mode for Food Plots
Most trail cameras offer a time-lapse mode that captures a photo at set intervals regardless of motion. Set a camera overlooking a food plot to capture one photo every 5 minutes from 4 PM to 8 AM. This shows you exactly when deer enter the field, which corners they use, and how many deer feed during different time windows — all without relying on motion triggers that might miss deer entering from the camera's blind spots.
Trail Camera Security
Camera theft is a reality, especially on public land and shared properties. Protect your investment:
- Cable locks: A Python-style cable lock deters casual theft. Loop the cable through the camera's security bracket and around the tree. Not theft-proof against determined criminals, but effective against opportunistic poachers.
- Security boxes: Steel security boxes encase the camera body, protecting against theft, bear damage, and livestock interference. Most are model-specific — buy the matching box for your camera.
- Height mounting: Mount cameras 8-10 feet high aimed downward. This puts cameras above eye level and out of easy reach. Image quality for buck identification is slightly reduced, but camera survival rate improves dramatically on public land.
- Camouflage placement: Position cameras on the back side of trees relative to foot traffic paths. A camera facing away from the nearest trail is less visible to passing hunters. Avoid placing cameras at obvious locations like gated parking areas where every visitor walks past.
Seasonal Camera Strategy
Summer (June-August)
Focus cameras on water sources and mineral sites. Summer velvet photos inventory the bucks on your property and let you track antler development. This is also when bucks are most tolerant of camera checking — they're less wary during summer and your visits cause minimal behavioral disruption.
Early Fall (September-October)
Transition cameras to food sources as deer shift from summer to fall feeding patterns. Bean fields, food plots, and acorn-producing oak stands are prime locations. Reduce check frequency to every 2-3 weeks for SD cameras. Switch to cellular cameras in core areas to eliminate all human intrusion.
Rut (Late October-November)
Move cameras to scrapes, rub lines, and terrain funnels. Buck activity at these locations peaks during the rut and provides the most actionable hunting intelligence. This is when cellular cameras pay for themselves — real-time photos of a target buck hitting a scrape at 7 AM tell you exactly where to be tomorrow morning.
Late Season (December-January)
Focus cameras on remaining food sources. Post-rut bucks are calorie-focused and travel predictable routes to high-energy food. Standing corn, brassica food plots, and winter wheat attract late-season deer movement that cameras capture reliably.
Budget Trail Camera Strategy
You don't need $300 cameras to get great intel. A smart budget strategy uses a mix of camera tiers: invest in 1-2 premium cellular cameras for your highest-priority locations (scrape lines, primary food source entries) and use budget $50-70 SD cameras for secondary trails and wider coverage. The cellular cameras deliver real-time data where it matters most while the budget cameras fill in the picture during your scheduled checks. This hybrid approach gives you comprehensive coverage at a fraction of the cost of running all cellular units.
Another money-saving approach: buy last year's camera models. When manufacturers release new versions, previous-generation cameras drop 30-40% in price while still performing nearly identically. A 2024 model Tactacam or Spypoint bought on clearance in early 2026 delivers 95% of the latest model's performance at 60% of the cost. Check closeout sections of major retailers during January and February for the best deals on previous-generation cellular cameras.
For public land hunters on a tight budget, even 2-3 inexpensive cameras placed on terrain funnels during October can reveal more about local deer movement than a month of boots-on-the-ground scouting. The key is strategic placement, not camera quantity.
Trail cameras are the most valuable scouting tool available to modern hunters. The information they provide — when used systematically and analyzed carefully — transforms random hunting into informed strategy. Invest in reliable cameras, deploy them wisely across the seasons, and let the data guide your decisions. Your success rate will reflect the effort.
Where to Buy Trail Cameras on a Budget
Check Price on Amazon →
Check Price on Amazon →
Check Price on Amazon →
Check Price on Amazon →
Get More Gear Guides
Join 10,000+ hunters and get our free Ultimate Gear Checklist plus weekly reviews delivered to your inbox.
Share this guide:
Related Articles
Spring Turkey Hunting Tactics 2026: Setups, Calling & Strategies That Work
Complete spring turkey hunting tactics guide. Run-and-gun vs sit-and-call strategies, decoy setups, calling sequences, and timing tips from 52 years of hunting experience.
How to Call Turkeys: Complete Guide for Spring Season
Turkey calling is both art and science. Master the essential calls—yelps, clucks, purrs, and cuts—with this comprehensive guide covering call types, techniques, and real-world hunting strategies for spring gobblers.
How to Field Dress a Deer: Step-by-Step Guide
Proper field dressing preserves meat quality and makes processing easier. This step-by-step guide covers everything from first cuts to cooling, with tips from five decades of deer processing experience.